Pages

Pages

Friday, July 29, 2011

review: no-heat curl methods

I've been seeing these 'no heat curl' methods floating around the internet lately and they've intrigued me. 
So I gave them a try. Here's my thoughts.

Method #1: Sock Bun Curls
You have to watch the video to get the full effect of how to do it.

Skeptical, but willing to give it a try.

Result: Not that impressed. My top curls were really kinky. Too kinky to even photograph. But the underside curls were pretty good - it looked like I just curled my ends. I'm not completely sure I did it right though. I may give it a second try.

I do, however, think this 'sock-bun' makes a pretty and full-looking bun.
Nice and easy for a girl who hates to do her hair. This girl.


Method #2: Vintage-style curls

She makes it look so easy.
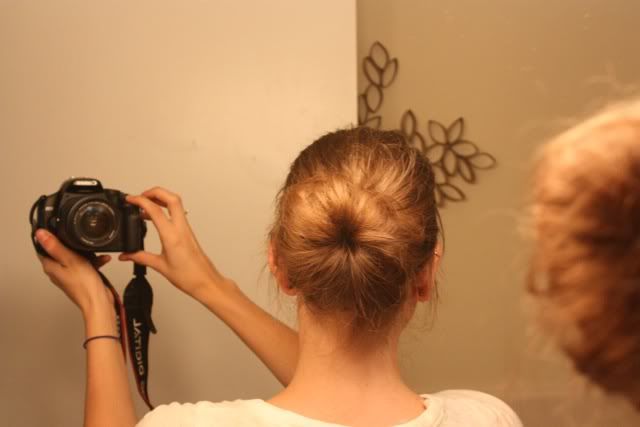
Here I am ready to try.

The set-up is pretty cute in and of itself. I'm still not sure if I could pull it off as an everyday look as well as some people I know.

Who knows? I may surprise myself one day. Or I may wake up late and not know how to salvage my hair. Either way, good to know.

Result: This method yielded much better results for me. Although, unlike in her video, I think it's better to start with completely dry hair and then dampen it with a spray bottle. That's what I did.

They were pretty, loose, i-didn't-try-very-hard-for-these curls. And I didn't. All I did was sleep. 


How 'bout you? Willing to give it a try?

Wednesday, July 27, 2011

crafting & creating for a cause

We are apart of a great church. Josh is a drummer for the worship band and I hold babies in the nursery for an hour every Sunday. But recently, I was recruited to be a co-leader of the NOW 10/40 Interior Design Team. Bascially, we create displays for all the missions efforts and teams that the church supports. I have an awesome partner, who is super creative and continually inspires me. She and I work well together bouncing around ideas and then making them come to life.

It has been a fun challenge for me to take my love of crafting and creating and focus it towards a cause that is near and dear to my heart.
Here is the first display we did - it was to remind the people of the church to pray for the girls who were going on a missions trip to Thailand. We wanted to focus on the girls themselves and give it a sort of homey feel - so it would be like you were looking at a picture of a sister or a friend on your living room wall and then remembering to pray for them.


Our church works closely with an organization called Freedom 4/24 which "exists to raise awareness of the rampant sexual exploitation of women around the world, and specifically in Southeast Asia, while raising money to support Christ-centered ministries that seek to rescue women enslaved in the sex industry." If you are looking for a ministry to support - this is a great one. The ministry gets its name from the fact that $24 is what it takes to purchase a night of freedom for a Thai prostitute. During her 24 hours of freedom she will be presented with alternative means of survival including education, employment, English lessons, food and housing. 
Buy Shirts
You can go here and buy a t-shirt for just $24 - it could result in a lifetime of freedom for a woman in Thailand.


Our next display, was for our India team which leaves this week. 
Our church has a history in India so we built a timeline so the church could see what we had already done in this country. This year, the team is building a second story onto the school that was built so that 400 more children can attend.


That final piece of the timeline was to be filled with these notebooks.
In order to raise money to make this second-story happen, we sold the notebooks that people could take home and decorate and bring back so that the team could give them to the children that attend the school.
We were to write a note and personalize it for the child that received it.

Here's one that I did:


Our prayers are with the India team as they leave this week.

Watch for more updates on this crafting and creating for a cause.

Monday, July 25, 2011

ruffle invitations how-to

what is more girly than ruffles? not many things. so when i was brainstorming the invites for my friend's baby shower for her baby girl, all i could think was ruffles. 
so here's what i came up with:
If you have even the teeny, tiniest knowledge of a sewing machine, you can make these yourself. trust.

First, find a bit of fabric that you like for your invites. 
Then cut it into strips, one for every invite you have.
*side note: electric fabric shears are the bomb.

Next, set your sewing machine up with coordinating thread and set your stitch length to be a gathering stitch - the highest my machine goes is 4, so that's where i set mine. This is important for making your ruffle. Then sew a line down the middle of your strip.

Once your strip is sewn, take one of the loose ends of thread and start pulling. The fabric will start to gather and within a few pulls, you'll have a ruffle.

Then, set your stitch length back to a smaller length and sew the ruffle onto your invitation.

Do this for as many invites as you need. In my case, 12.


I think these could work for many different occasions and I'm already trying to think up an excuse to make them again sometime. Here's hoping some of you try your hand at these!

And be sure to let me know if you do! 

Friday, July 22, 2011

dollar store project: moss frame

The other day while I was perusing the dollar store, this little number caught my eye.

It was probably the wannabe vintage pattern, that upon closer inspection is not very cute, that caught my eye, but I still had an idea for this frame. I could use the leftover moss from this project to actually make this frame cute. 
Armed with a hot glue gun, one can do great things.

I'd say it was a decent investment of a dollar. 

Wouldn't you?

Thursday, July 21, 2011

the easiest side of your life

Wondering what to do with all that zucchini on sale at the store?
Here is a quick and easy side dish that is nutritious and delicious.

Breaded Zucchini Chips
adapted from Tammy Goodman
Ingredients
Panko bread crumbs
Grated Parmesan cheese
Egg whites from 2 eggs
Zucchini


Cut your zucchini into 1 inch slices.

Prepare bowls of egg whites and panko bread crumbs mixed with parmesan cheese.

Dip each slice into the egg whites...

...and then the bread crumb mixture.

Place on a baking sheet. Bake at 475 degrees for 15 minutes, or until browned; flipping once.

I said it was easy. 
Try it, you'll like it.

Wednesday, July 20, 2011

making a statement: diy photo gallery ledges

We have a pretty big living room. With a pretty big wall. I used to have these three shelves hung to occupy space on this big wall.

But it just wasn't cutting it. They were getting swallowed up by the expanse that is the huge cream-colored wall. So I asked Josh if he would build us some of Ana White's photo gallery ledges.
They are fairly simple to make and cost less than $10. Our kind of project.
Be sure to click the link and follow her plans if you want to build some yourself!

See what I mean about the expanse of wall?

We decided two would be enough to make a statement.

Gotta love a hubby that does the touch up paint job!


And here you have it, folks. A statement wall.

I will continue to collect frames and find pictures/art to fill them with. You know I love a good reason to collect things.

Ah, I'm feeling much better about this wall now.

Psst - do you like that "Love is spoken here" print? It'll be for sale in my etsy shop - coming soon!