Pages

Pages

Monday, August 15, 2011

use it up: a week of meals

One thing I struggle with when meal planning is figuring out how to use up all of an ingredient without making the same meal twice. I hate when I let a product expire or go to waste - it just feels wrong.
A great resource I use for getting ideas for things to try and new recipes is the Everyday with Rachael Ray magazine. In each magazine, she includes a week of meals that repeat the same ingredients in order to use them all up. Typically, one or more of the meals is not my cup of tea, so the idea is wasted on me. But this month's week of meals was spot on for things we like to eat.
Maybe it is for you, too. 

Chicken with Apples, Raisins, & Olives ~ Crispy Fish with Creamed Corn ~ Mushroom Fusilli ~Sausage Rolls and Spinach Salad ~Spinach & Ricotta Quiche

If you'd like to make this week of 'use it up' meals, here's what you'll need:

Shopping List
Produce
1 large apple (such as gala or cortland)
1 lemon
8 ears of corn*
2 red bell peppers
2 beefsteak tomatoes
1 package of baby spinach
1 head of garlic
1 package (10 oz.) mushrooms
1 bunch flat-leaf parsley
Dairy
1 pt. heavy cream
1 stick unsalted butter
1 container (15 oz.) ricotta cheese
1/2 dozen eggs
Fish
4 tilapia fillets
Meat
1 lb. italian sausage links
1 1/2 lbs. skinless, boneless chicken thighs*
Bakery
1 small loaf of crusty bread*
Grocery
1 jar grainy mustard
1 box fusilli pasta
1 box garlic and olive oil couscous
ground cinnamon
1 bag of raisins
1 pkg. frozen puff pastry
2 oz. green olives*

*Because I wanted to use what I already had - I used frozen corn instead of fresh, I used chicken breasts instead of thighs, I crushed a bag of croutons instead of making breadcrumbs, and I nixed the olives.

Day 1: Chicken with Apples, Raisins & Olives
Serves 4 | 15 min prep | 15 min cook

Ingredients:
2 tbsp butter
1 tbsp evoo
1 1/2 lbs. skinless, boneless chicken
1 large apple cut into 1/2 inch cubes
1/3 C raisins
1/2 tsp ground cinnamon
1/3 C large green olives, pitted and chopped
1 box garlic and olive oil couscous
1/2 lemon, cut into wedges (save the rest for later!)
*Since I nixed the olives, I added onions and prosciutto instead.

Directions: 1) In a large skillet, melt the butter in the evoo over med-high heat. Season the chicken with salt and pepper, add to the pan and cook, turning once, until golden-brown and just firm to the touch, 8 minutes. Transfer to a plate and cover with foil. 2) Add the apple, raisins, (& onions if you choose) and cinnamon to the skillet with 1/3 C water and scrape up the browned bits; season with salt and pepper. Cover and cook over medium heat until the apple is tender, about 5 minutes. Cut the chicken into chunks and stir into the mixture with any chicken juices. Stir in the olives and remove from heat. 3) Meanwhile, prepare the couscous according to package directions. Spoon onto plates, top with the chicken mixture and serve with lemon wedges.
Enjoy!


Here's a glimpse of what's to come:
 a9039a01.jpg


Believe me, I couldn't believe that the food looked as good as it tasted. 
Join me this week for some great recipes!

Friday, August 12, 2011

sentimental packrat

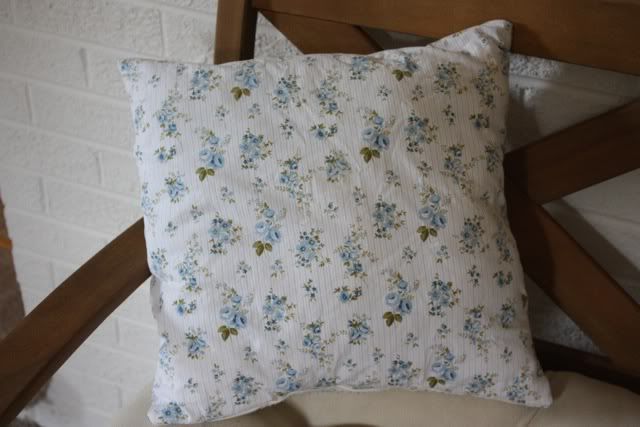
I was so excited when I found this beautifully embroidered pillow while I was on vacation. I forgot to take a before picture, but it was attached to some hideous, frilly lace and the back of the pillow fabric was no good. But I knew this beautiful embroidery could be saved and transformed.

When I laid eyes on it, I knew it would be perfect for Sebastiana's nursery.

My only problem was that I could not find a good fabric that went with the vintage/blue-pink-yellow color scheme for the nursery. So as a last resort, I was looking through my scrap fabric pile to see if I could find a piece that was big enough and also coordinated well.

I've always known I was a sentimental packrat (I actually saved every movie stub from Josh and I's three year dating relationship and put them in a scrapbook - ridiculous, I know), but I was reminded of this fact when I saw this in my scrap fabric pile:
Not the picture. The dress. I had saved my highschool graduation dress. That's my highschool bff, Kendra with me. We were just a little happy to be graduated from highschool. I promise we didn't always look so cheesy. Proof positive:

Okay, the hats don't really help, but it was 2003, cut us some slack.

Well, wouldn't you know it, I finally decided to cut up that dress and use it for this worthy cause - for Baby Sebastiana.

It's going to look perfect in her nursery.
Get excited. Finished nursery reveal coming soon!

Wednesday, August 10, 2011

an accidental collection

The other day while I was cleaning my house, I realized I may have started an accidental collection.


These sweet little flower bowls just reel me in somehow. I'm not sure the backstory on these guys, but I see them in different sizes and colors and I'm just attracted to them.

My friend thought I did collect them and picked me up that yellow one recently for a quarter at goodwill.
That's when I realized it.
Well, I may as well make it official. 
I've started a new collection.

Anyone know the story on these?

Tuesday, August 9, 2011

somebody pinch me

So, the story begins with my weekly goodwill trip. It was a trip like any other - there were a few things I was debating, but nothing I couldn't live without. 
Then I saw this box. 
I have been shocked and appalled by opening boxes before at goodwill, believe me. People donate some weird stuff. But the fact that the box said the word bathroom, made me even more skeptical. What could Mr. O be donating from his bathroom? A dirty toilet cleaner? Used toiletries? A bedpan?
My curiosity got the best of me.
So, I peeked inside the box...only to be shocked and appalled in a good way.
Mr. O was apparently a classy guy.
Look what he had all up in his bathroom.
A gorgeous chandelier. 
I could not believe my eyes when I pulled it out. Somebody pinch me. Did I really just find this at goodwill?
The details are so unique and beautiful.
Goodwill always surprises me with their pricing too - $7, seriously? I've seen ugly picture frames priced for more.
And would you believe those are real crystals?! 
Good. You shouldn't. Give the goodwill people a little more credit than that.
Still, those faux crystals are going to look so beautiful when it's all lit up.


Here's where my mind went when I saw it:


Now all I need to figure out is how to convince my husband that this is so much better than a ceiling fan. It may be difficult - the man loves a good ceiling fan.

Friday, August 5, 2011

a tiered platter for 60 cents

Some days you just get lucky at the thrift store. Such was the day that I found these two yellow plates  stacked nicely together on the miscellaneous dishware rack. Miscellaneous dishware rack = 4/$1.00.  And it's not everyday you find cute dishes in perfect condition and in perfectly correlating sizes.
Days later, I found this glass candle holder at a yard sale for $.10. 
The perfect combination for making a tiered platter.

You may recall I've dabbled in making a tiered platter before, but alas, it did not survive our last move.
So, when I was thinking of things I needed for an upcoming event I'm hosting, these plates came to mind.

All you need in order to make this project work is epoxy glue, something heavy to weigh it down, and patience to leave it alone while it dries.

And then you get this! It's going to be perfect for my food display I'm dreaming up.

This is a great go-to project when you're planning and/or hosting an event. Food display in a snap!
I think this could be cute with mis-matched plates in different sizes, too!
Or as a single cake plate - here's the first one {of many} I ever made using an on-sale anthro plate 
and a candlestick holder:
So, what do you say? Are you gonna think twice about those discarded plates at the thrift store now?

Thursday, August 4, 2011

french door finishing & reveal

This is long overdue. In my defense, I finished them two weeks ago, but am just getting around to posting about it. Not much better, I know. If you didn't read the beginning of the french door saga, start here.

So, when I was finally finished painting, we hung the doors. Sadly, they sat like this for longer than I want to admit.

But when I finally got around to peeling the protective covering off the window panes, I was so happy with how easily and cleanly they removed.


I was a tad worried that I would have to do some touch up work due to leakage. But I tell you what, that professional grade protective plastic is awesome. No leaks. 

The only issue I did run into was a little chipped paint due to the fact that I had to dig in the corners to find the end of the protective plastic.

But was I about to haul out all the paint supplies for such a small job? Nay. It was nothing a little white out couldn't take care of. My husband saw me doing this and was mortified. I, for one, thought I was quite resourceful. 

I mean, where else can you find a tiny brush perfect for window pane corners?

And here's how they look in all their finished goodness:


The door knobs were 2 for $4.99 at world market. They're actually drawer pulls, but we made them work as french door knobs. 
(The hello sign does not have a new home, it is sitting there temporarily as our mud room is under major construction - more to come on that.)

I love the view into the office now. 
And now I can breathe a huge sigh of relief.

Who's side are you on? Josh's or mine? Can white out be used for small touch ups or what?

Tuesday, August 2, 2011

pinterest challenge project: diy belt

I am enamored with pinterest. It is such a great source of inspiration. I could spend all day long filling my boards with beautiful pictures and diy projects. But what good is that if I never actually complete any of the projects I pin? That is the logic behind 'the pinterest challenge'.
I got all my details here from young house love.


The challenge is basically to put your own spin on a pinterest-inspired project and complete it.

So, here was my pinspiration, if you will.
To make a ruffled belt like this one from 100layercake.

I've developed a love for belts recently and this one looked like something that could be quite versatile.
To get the general gist of making the belt, check out the instructions here.

For mine I wanted to make it a flower/ruffle combo. I had the perfect chiffon-type fabric that would work quite nicely. It was left over from this project.
For the flowers I did more of a layered look as I wanted them to lay more flat and I added a jewel to help define the flowers in the midst of the sea of ruffles.

But for the ruffles, I followed the basic instructions from 100layercake.
All it takes is a few stitches through your pinched fabric to create a beautiful ruffle effect.

And here's my finished product:


The back doesn't look that great, but no one's going to see it.
(so if you know me and see me wearing this, pretend you never saw this.)

In the original version, they leave the ribbon to be tied in the back. But I mainly intend to wear this belt with dresses and there's just something about ribbon tied belts on dresses that reminds me of being 12. And I try to look 26 these days. So, I pulled out my secret weapon for making my belt fit:

And then all that was left was to try it on.


This little glimpse of my new belt made me smile.
Challenge complete.

I think I need to pinterest challenge myself more often. But thanks for the kick in the pants, sherry.