Pages

Pages

Wednesday, August 24, 2011

hosting a baby shower

I had the pleasure of hosting my first ever baby shower for my friend Kerry this past weekend.

Here are my ingredients for a great baby shower:

Pretty decorations - of course pom-poms.

A set table.

Flowered centerpiece.

Bunting! I made my first ever bunting.

It's definitely homemade looking, but Kerry loved it so much she took it home with her.

Drink/Dessert Table
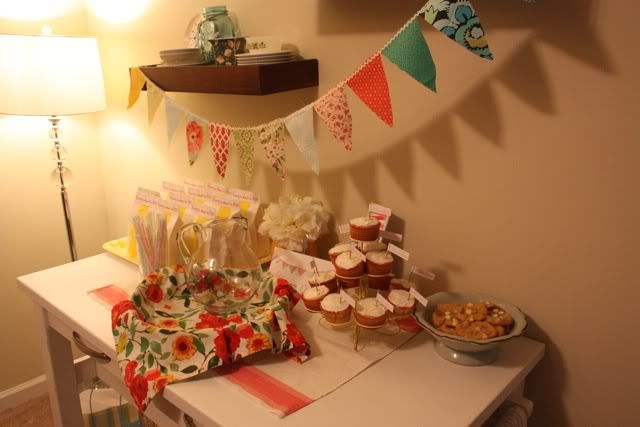
ac8be9d0.jpg

Place settings


Something to make the mommy-to-be look special.

Keepsakes from friends for Kerry to take home (designed by yours truly).

And of course, good food!
Fruit kabobs

Mini Almond Poppy Seed muffins

This is where cake plates come in handy.

I didn't get a chance to take photos of all the food. But here are some things I made:


Chicken Salad made with grapes & walnuts

What shower is complete without dessert?!


And favors for the guests to take home.

Homemade white cheddar popcorn. :)

And finally - photobooth fun!
p.s. The backdrop is a vintage bedsheet I got at a yard sale for 50 cents!


It was a lovely afternoon being with all these ladies!

Tuesday, August 23, 2011

blog updates

What do you think of the new header?


I finally got around to sitting down and making it a little more 'me' and a little more relative to my content. I'm one of those people who likes to change things up every so often so don't be surprised if my header/background falls subject to this. Yes, I also change my bedding seasonally.


Next up, I've also changed my url. What used to be www.honeysucklehigh.blogspot.com is now:

www.honeysuckleblog.blogspot.com

I only originally picked honeysucklehigh.blogspot because honeysuckle, honeysucklehome, and honeysuckleblog were all taken. Well, honeysuckleblog recently became available so I snatched it up.

And lastly, I've changed my comment form to DISQUS. Several of you have informed me that you have problems leaving comments and this is a problem I want to fix because i love your comments - they make my day! DISQUS is more user-friendly and will also allow me to reply specifically to your comments instead of just generally in the same post.


I hope you enjoy the upgraded site.

Monday, August 22, 2011

{thinking about} christmas in august

When I found my old graduation dress, I also found some other old clothes that I must have seen a potential for saving.

Exhibit A:

When I saw it, I knew I must have saved it because the Christmas-y fabric. 
So my brain went straight to Christmas. Here was my train of thought:
What could I make with this small amount of fabric? Cut strips for package decorations? Cut circles for making fabric flowers? Maybe something Christmas-y to add to a cardigan? A bow? Ooo...I should make a Christmas bow for Baxter --- a bowtie!

And the idea was born.
So, I went to work.

Bowties are easy to make - first, cut a square and then cut a little strip off  that will be your center part of the tie.

Then, fold your fabric in half. Right sides together. Sew the long side and one short side.

Flip it right side out. Sew the other side closed. Fold in half again so that the exposed sewn side is in the back. Essentially you are folding it into a small rectangle.


For the center strip, fold it in half and sew the right sides together. Flip the right side out. Situate it around the center of your folded rectangle and sew it tight in the back. 

If you want to be able to tie your bow to something then leave enough of the center part to be able to tie.


I wanted to be able to take off Baxter's collar and just have the bowtie on so I made a neck strap and added velcro.


And I'll tell ya what, Baxter looks pretty darn cute in his new bowtie.


I've never tried to put any type of clothing or accessory on Baxter, so I wasn't sure how he'd do. He really was a good sport about posing. I also showed him a treat, so that helped.
It's got me excited about taking our Christmas picture this year.


Is it too early to be thinking about Christmas?

Friday, August 19, 2011

Day 5: Spinach and Ricotta Quiche

Day 5: Spinach and Ricotta Quiche
Serves 4 | 15 min prep | 55 min bake
Ingredients
1 sheet frozen puff pastry, thawed
2 tbsp evoo
6 C baby spinach
1/4 lb Italian sausage links, casings removed
4 eggs
1/2 container ricotta cheese
1/2 C heavy cream

Directions: 1) Preheat the oven to 400 degrees. Press the puff pastry into a 9-inch glass pie plate; trim the excess. Prick the bottom all over with a fork, line with parchment and fill with dried beans (or pie weights).* Bake until golden, about 20 minutes. Remove the parchment and beans; transfer the pan to a cooling rack. Leave the oven on, but lower the temperature to 350 degrees. 2) Meanwhile, in a large skillet, heat 1 tbsp evoo over med-high heat. Add the spinach and cook, tossing until wilted, about 1 minute. Season lightly with salt, then drain in a colander. Add 1 tbsp evoo and the sausage to the skillet; cook over med-high heat, breaking the meat up with a spoon, until golden-brown and cooked through, 3 to 4 minutes. 3) Spread the sausage and spinach in the pie shell. In a large bowl, whisk together the eggs, ricotta and cream; pour into the shell. Bake until the eggs are set and the crust is golden, about 35 minutes. 

*I didn't have dried beans or a pie weight, so I just used another pie pan and put it on top to ensure the puff pastry stayed put.

Enjoy!


I hope some of you enjoyed this week of food. Even if you didn't have a chance to make the meals this week, I hope you'll try them in the future - you won't be disappointed!


Thursday, August 18, 2011

Day 4: Sausage Rolls and Spinach Salad

Day 4: Sausage Rolls with Spinach Salad
Serves 4 | 25 min prep | 30 min bake

Ingredients
3/4 lb. Italian sausage links, casings removed
1/2 C breadcrumbs
1 red bell pepper, 1/2 finely chopped & 1/2 cut into thin strips
1 sheet frozen puff pastry, thawed but chilled
1 egg, beaten
1 tbsp evoo
1 tbsp grainy mustard
1/2 lemon, juiced
6 C baby spinach

Directions: 1) Preheat the oven to 400 degrees. Line a rimmed baking sheet with parchment. Crumble the sausage into a bowl. Stir in the breadcrumbs and chopped bell pepper. Divide the mixture into half and form each into an 11-inch-long log; refrigerate. 2) Line a work surface with a 16-inch length of parchment. Set the sheet of cold puff pastry on top and roll out into an 11-inch square. Cut the pastry in half. Lay a sausage log down the center of each strip. Brush the long sides with some of the egg. Wrap the sausage in the pastry; press the seam to seal, but do not seal the short ends. Transfer to the baking sheet seam side down. 3) Brush the tops with the remaining egg and refrigerate for 15 minutes. Bake until puffed and golden, 25 to 30 minutes. Let rest for 10 minutes; quarter each roll crosswise for a total of 8 pieces. 4) Meanwhile, in a bowl, whisk together the evoo, mustard, and lemon juice; season with salt and pepper. Stir in the bell pepper strips and spinach; toss well.

Enjoy!

Wednesday, August 17, 2011

Day 3: Mushroom Fusilli with Garlic Breadcrumbs

Day 3: Mushroom Fusilli with Garlic Breadcrumbs
Serves 4 | 15 min prep | 20 min cook
Ingredients
1 box fusilli pasta
1/2 container ricotta cheese
2 tbsp olive oil
1 C breadcrumbs
3 cloves garlic, finely chopped
1/3 C chopped flat-leaf parsley
1 pkg. sliced mushrooms
1 red bell pepper, cut into 1/2-inch squares
1 C heavy cream

Directions: 1) In a large pot of boiling, salted water, cook the pasta according to package directions until al dente; drain, reserving 1/2 C of the pasta cooking water. Return the pasta to the pot and stir in the ricotta cheese, adding the reserved cooking water to thin the consistency as desired. 2) Meanwhile, in a large skillet, heat 1 tbsp evoo over med-high heat; add the breadcrumbs and cook, stirring often, until golden-brown, about 3 minutes. Stir in the garlic and cook for 30 seconds more. Remove from the heat and stir in half of the parsley; season with salt and pepper. Transfer to a bowl and wipe out the skillet. 3) In the same skillet, heat the remaining 1 tbsp. evoo over med-high heat. Add the mushrooms and cook, undisturbed for the first few minutes, until they have released all their liquid and are golden, about 5 minutes. Stir in the bell pepper and cook for 2 minutes, then stir in the cream. Reduce the heat to a simmer and cook until the liquid is reduced by half, about 3 minutes. 4) Toss the pasta mixture with the mushroom cream sauce; stir in the remaining parsley.  Sprinkle with the breadcrumbs before serving.

Enjoy!

Tuesday, August 16, 2011

Day 2: Crispy Fish with Creamed Corn

Day 2: Crispy Fish with Creamed Corn
Serves 4 | 20 min prep | 25 min cook
Ingredients
4 tilapia fillets
6 tbsp grainy mustard
1 cup breadcrumbs
4 cups fresh corn kernels (from 8 ears)
4 tbsp unsalted butter
1/2 C heavy cream
1/4 C Olive Oil
2 tbsp chopped flat-leaf parsley
2 beefsteak tomatoes, cut into wedges

Directions: 1) If you opted to go for fresh breadcrumbs, grind the small loaf of crusty bread into breadcrumbs in a food processor for this week's meals. Refrigerate in a plastic bag. If you opted for croutons, crush them into crumbs. 2) Season the fish with salt and pepper and place onto a large plate; spread 1 1/2 tbsp mustard evenly on top of each piece. Sprinkle the breadcrumbs over the mustard, pressing to adhere. Refrigerate while you make the creamed corn. 3) Using a food processor, puree 3 cups corn kernels. Transfer to a small saucepan and stir in the remaining 1 cup kernels. Add the butter and cook over medium heat until hot, about 5 minutes. Stir in the cream and cook, stirring occasionally, until slightly thickened, about 5 minutes. Season with salt and pepper. Remove from the heat and cover to keep warm. 4) In a nonstick skillet, heat 2 tbsp olive oil over med-high heat. Add 2 pieces of fish crumb side down, reduce the heat to medium and cook, turning once, until golden and crisp, about 8 minutes. Repeat with the remaining 2 tbsp olive oil and fish. 5) Serve the fish on a bed of the creamed corn. Sprinkle with the parsley and serve with tomato wedges. Season with salt and pepper. (I opted to marinate my tomato wedges in balsamic vinegar.)

Enjoy!